Ruger Pistol Forums banner

How to remove trigger take-up

2 reading
7.1K views 8 replies 7 participants last post by  falconbobb  
#1 · (Edited)
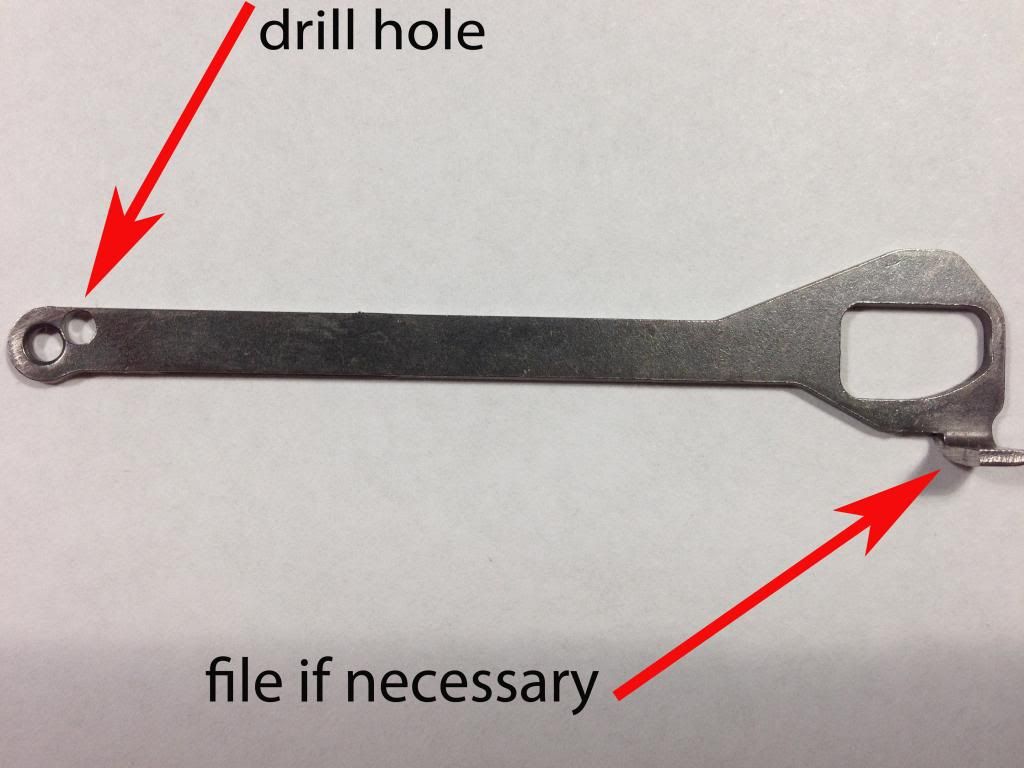
I have seen posts of complaints about the 1/4 inch of trigger take-up, before the hammer starts to move. This is easy to eliminate, if you can drill a 3/32 diameter hole. Remove the trigger bar, drill that 3/32 inch hole to the rear of the original front hole in the trigger bar, just slightly higher and close to the original hole, without breaking into the original hole. Note that it doesn't have to be quite as high, or as close to the original hole, as shown in the photo. As long as you do not break into the original hole, you can always revert the LC9 back to the original pull, just by installing the original trigger bar hole back into the trigger pivot pin(#2), as it originally came from the factory.

By drilling the new hole, you remove most all of the take-up, plus you move the trigger break point forward 1/4 inch. The results are almost the same as the Galloway Precisions new 35% trigger bar. When you assemble the gun, if after racking, and pulling the trigger does not move the hammer, you just need to file a small amount of metal off the leading edge of the trigger bar tab, to get the hammer reset. Assemble and test. If still no reset, do this again, until the hammer pulls. It is best to only file a maximum of .005 inch off at a time and test. When finished you have removed nearly all the take-up, you have moved the deep breaking trigger point forward 1/4 inch, and nothing else has changed with the gun. All safeties still function, the hammer pulls back to the factory point, you just shortened the pull and moved it forward by 1/4 inch.

Bob


#2 ·
Thanks for the good information. The new hole that you drilled, with wear, will it break into the manufacture orginal hole? That would be my main concern.
 
#4 · (Edited)
No, unless you have many thousands and thousands of rounds down line, and even then it would not likely wear through. It is a heat treated bar, to make the metal tougher and less likely to wear. The pressure is fairly rearward, so the thin top area would not be an issue. The photo is of the original Galloway Precision trigger kit trigger bar, where he took a stock LC9 trigger bar and added the extra hole. I modified several stock trigger bars, making the hole about .020 lower than the photo, and .010 further away from the hole. My current trigger bar is in my LC9, and I don't want to pull it out just for a photo, to show the minor differences. The Galloway original kit was stopped over two years ago, due to Ruger cutting off Galloway's supply of trigger bars and hammers. Galloway sold over 3000 of those kits, and I have not heard of one instance of the trigger bar hole wearing through. I have the original Galloway hammer in my LC9, but my own trigger bar, and there is no noticeable wear to the hole, with about 1200 rounds down line and easily over 1000 dry fires.

Also I would suggest instead of using a 3/32 drill bit (.0938 diameter), use a #43 drill bit (.089 diameter). 3/32 is what Ruger makes the hole, but there is some extra play. By using the smaller drill bit, you eliminate a little extra trigger play/movement.

The following link shows a short video of my current trigger pull, which is a shorter pull that my OP mods will produce (the video shows the pull is 1/2 inch shorter than stock versus the above hole mod, which has a 1/4 inch shorter pull than stock):


You will see I have a screw and nut to stop over-travel. Without that stop, the trigger would travel another 1/16 inch. It may not look good, but it works just fine, plus the only person that ever sees my SD gun is me, or those the see the photos/videos. The trigger is the stock LC9 trigger, that I heated and straightened. Heating removes the finish, so I polished the trigger. I did not like the excessive hook at the bottom of the stock trigger. The pull felt like only the bottom 1/3 of my finger was pulling, not the pad of the finger, like it should be. Since this was the original Galloway hammer, it does not pull back the same distance as the stock hammer. I originally got some light hits, but after replacing the firing pin return spring, I have not had any light hits. Light hits was an issue with a number of stock LC9s, with serial numbers starting with 320 and 321. Those with 322 and higher all have the newer firing pin spring, which Ruger engineers determined was the fix for the issue. My trigger pull weight is 6.5 pounds, measuring with a Lyman digital trigger gauge. You can't get it much lower, or you bring in the issue of light hits.


Bob
 
#7 ·
The LC9/LC380 has excessive trigger take -up or free play, which ever you wish to call it. With the hammer in the half cocked position, when the trigger is pulled, the trigger moves about 1/4 inch, before it starts to pull the hammer back. This is the trigger take-up, the trigger is moving but not doing anything to start the firing process. The extra hole removes this wasted trigger movement (take-up). With the extra hole, the trigger moves and almost immediately starts pulling the hammer back. Since the pulling of the hammer is starting about 1/4 inch further forward, everything is shifted forward that 1/4 inch, including the break point being moved forward 1/4 inch. That is as simple as I can describe it. It is a mechanical action of the trigger movement. The trigger is attached to the trigger bar, and when the trigger is pulled back, the trigger bar moves forward, pulling the bottom of the hammer forward, which in turn moves the top of the hammer back, until the break point, when the trigger bar drops down and releases the hammer (boom).

Bob